Showing posts with label projects. Show all posts
Monday, November 7, 2011

Baby the Rain Must Fall


Please grab a featured button.


Two ways to keep up with the latest  features: "Like" our page on Facebook and follow us on Twitter


Saturday, November 5, 2011

Oh the shark has such teeth...


Please grab a featured button.


Two ways to keep up with the latest  features: "Like" our page on Facebook and follow us on Twitter


Thursday, October 20, 2011

Make DIY Metallic Thanksgiving Table Decor!


Created by: My Suite Bliss


Please grab a featured button.


Two ways to keep up with the latest  features: "Like" our page on Facebook and follow us on Twitter


Thursday, March 10, 2011


DIY: Graphics Fairy Images

The ever so clever Graphics Fairy
has Easter images up.
These are just too cute! 
Let me see what you make with it and I may FEATURE it!


to see the images, click below:


Please grab a featured button.
Wednesday, February 9, 2011

I'm Walking In a Spiders Web, But Leave a Message...


There have been a lot of cork boards/ message boards floating around blog land, although none as fabulous as the cork boards created by Beth at The Stories from A to Z. This would be a stylish addition to my craft/office I am in the midst of creating:


Now, if I could just narrow down what I want to use for fabric in my room, I’d be all set!


You Keep Me Hanging On

This idea, to fill a large wall, from Adrianne at Dream Book Design is beyond brilliant!  She used new wood, made to look like driftwood, to create a wall art so fabulous that I foresee HER being copied by the likes of Pottery Barn:


You can see her tutorial on how to put one of these together HERE.

Tuesday, February 8, 2011

Who's The Fairest Of Them All?

Super talented Mandi of Tidbits from the Tremaynes made this gorgeous Pottery Barn knock-off:


I think her version is just as fabulous, no, make that more fabulous than the Pottery Barn version! Pottery Barn version $699. Hers, Dollar Store mirrors and wood from around the house!


Head over to Tidbits from the Tremaynes to see her complete tutorial and tell her I said Hi!


Hanging on a Heartbeat


I don’t know where my addiction/obsession comes from, but if it is made from burlap, I am bound to L.O.V.E. it. This holds true with this fabulous wreath over at Choose To Thrive blog:


Isn’t it stunning with its sweet burlap rosettes and white bow? 


Valentine Love at Tatertots & Jello


As someone who has followed Tatertots & Jello for sometime, I think she just may have a fondness for Valentine’s Day! Just take a look at these photos for her fabulous creations (and she is kind enough to include tutorials!):


Make Super-Sized Valentine Subway Art

Valentine Subway Art


Bunting Wreath {that\

Bunting Wreath {that's interchangeable}


Valentine\


A great homemade Valentine\


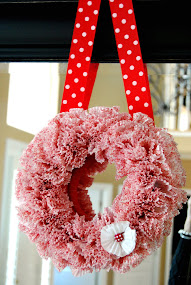
Make a Whimsical Cupcake Wrapper Wreath!
Make a Valentine Burlap and Coffee Filter Wall Hanging!


Valentine XOXO Marble Craft


I the super talented Tatertots & Jello!

Valentine Sugar Cookie Pops


Continuing with our Valentine series, I came across this tutorial at Our Best Bites  for super cute, super simple sugar cookie pops that I just had to include! Wouldn’t these be great for your loved ones? 

 
First things first, make your cookie dough. Make whatever sugar cookie recipe you like (you can even use a boxed mix or Pillsbury cookies). Roll out your sugar cookie dough as you normally would. Roll it so that it is slightly thick because you want your stick to stay in place, but not too thick because it will cause it too be too heavy and fall off. 1/4" should be good. Cut your shape with a heart shaped cutter. Lay the dough directly on top of a stick. You want the stick to come about half way up the cookie. Gently press down with your fingers just a bit and the baking will do the rest.
 
Bake your cookie pops until the edges are just barely golden brown. Remove from oven and cool completely.

A great tip from Our Best Bites: As soon as her cookies were out of the oven and cooled, she put them in an airtight container in the freezer. Then when she was ready to decorate the next day, she took them out in the morning and starting icing them right away (while they were still frozen.) By a few hours later the cookies were defrosted and the icing was dry enough to package- and the cookies were super fresh.
 
You can decorate how you like to make them appealing for your family. Our Best Bites includes her recipe for Glacé Icing  For further decorating tips, stop over to see what she did to make hers spectacular.
 
To make them special for gift giving, once dry, wrap in cellophane. Pop the cookies into cellophane treat bags (Dollar Tree has Valentine Treat bags) and tie with ribbon around the sticks.
 
Don’t limit yourself to your family when handing these lovelies out! Your friends and coworkers will love you for this treat!

Felt Fortune Cookies


I will be featuring some, what I think are great, Valentine ideas. My thought behind this is that we can make a fabulous Valentine’s Day for our significant other and our children without spending a fortune. If you have something you feel fits into this category, please feel free to send it along to me. I would love to feature you!

To start this series off, here is an oldie but goodie from Martha Stewart:


Instructions via Martha:

Felt Fortune Cookie How-To
1. Using fabric shears, cut a 4 1/2-inch-diameter circle from a piece of felt.
Cut a piece of matching ribbon slightly shorter than 4 1/2 inches.
Using wire cutters, cut a piece of floral wire slightly shorter than the length of ribbon.
 
2. Using craft glue, affix the wire to the middle of the felt circle. Glue ribbon on top, covering the wire. Let dry 30 minutes.

3. Fold the felt circle in half, using the wire as a guide, so ribbon is inside cookie. Next, angle the sides toward each other, bending the wire at its halfway point and forming a fortune-cookie shape, as shown.

4. Assemble the fortune cookies. Carefully peel back one flap of the felt cookie, and insert a paper fortune and a few candies. Fold the flap back over to close cookie around contents.
Friday, February 4, 2011

Spray Paint 101


Spray painting is the technique we utilize most on our furniture re-do’s. I thought I’d take this opportunity to share what works and what doesn’t:

Metal

Why Spray Paint? 
Why we choose to use spray paint:
First because, as inexperienced wanna-be furniture rehabbers, I contacted Kathy at Creative Home Expressions who shared tips with us.  Second, through trial and error, we found that spray gave the most even coverage (if applied correctly) while brushing almost always leaves brush marks. It is our opinion that spray paint provides a more professional finish. Additionally, spray painting takes much less time.  Note: At this time we do use spray cans. Although we have a sprayer, we haven’t yet done a large piece (this is forthcoming as I have been getting some GREAT deals!), therefore we have yet to pull this out and practice.


Cost Effective: 
It is our opinion that spraying is much more cost effective than brushing because of the time involved as well as how much paint it would take to brush and try not to leave marks.

Our Choice Of Paint: We ONLY use Valspar spray paints. Even without a clear coat their paint coverage and finished look is amazing! Never, ever buy the el-cheapo cans. You will get what you pay for.

High Gloss, Semi-Gloss & Flat:
It depends on your project but we generally choose semi-gloss. This is the look we like and we also find it more durable with children.

Prime, Prime, Everywhere a Prime: Do we prime? Yes! You will get better coverage and better overall results.

Sand?Yes, we always do at least a minimum sanding. By this I mean we lightly rough up the surface to give the primer somewhere to stick. We use 220 grit sandpaper. If you don’t sand, you run the risk of peeling and not sticking.

Color Choices:
This is an individual choice, but for use we like: White Ivory, Black, Blue, and Gray. They also have better coverage.

Paint runs:To avoid runs in your spray paint, apply thin coats of the spray paint. Spraying too much on will cause the paint to run. Next time we paint, we hope to do a video tutorial showing our technique.  If we do get a run in the paint, we lightly sand that spot and paint another coat.

Where to spray? We spray in a workroom and have sprayed in the garage. Doing your painting inside allows you to control your environment (temperature, etc). We cover our spray area in plastic to prevent overspray on other areas.  Sometimes there is still some overspray. Please keep that in mind when you start spraying.

Do you spray outside?
Hardly ever and it is from personal experience we no longer do this. There are two main reasons: First,  we did so and it was ruined due to sun and heat. It caused the paint to bubble. We had to sand it all down and start from scratch. Time and money waster. The other reason is the bugs. We can get a piece finished and see where a bug flew in. I don’t know about you, but I don’t want to see a painted bug carcass in my work. 

Other Tips:
Spray in a well ventilated area or wear a mask.
Buy quality paint!


Step by step

It's easy to create a beautiful, durable finish. All you need to do is follow these simple steps.
Note that some projects will require even fewer steps - not all objects will require sanding and priming.

Sunday, January 30, 2011

Quick sack, twelve pack, back again

We came up with an easy upgrade that made a great gift. Dave and I needed a gift for a friend and snagged this sign, after I convinced him that the bright and cheery colors would look great at our friend's bar and complement his other bar decor.  


The sign is shaped as a bottle cap and it's lively colors will be oh so cheery! We picked up the sign for $6 and the clock parts for $5. All Dave had to do was locate the center,drill a hole and attach the clock parts to the sign. Results in about five minutes flat.


Simple? Check. Cheap? Check? Anyone can do it? Check. Plus it made a great gift!
And speaking of quick change-overs, what have you guys been transforming on the cheap? Any other projects going on?
Do tell!


Monday, January 24, 2011

Want Your Name In Lights


Extreme Personal Measures is the place to feature your home design projects!  


Do you want to be featured? 

This is your opportunity to promote your blog and show off your skills.


What I am looking for:
The project will need to involve home design, decor etc.
The project must be complete with clear before and after photos.


What types of projects are we looking for?
Tutorial
Remodeling
Before and after
Home improvement
Organizing
Decorating Projects


What you need to include in your email:
Your name.
Your blog name and blog address.
Links to the projects you would like to have featured

Please note: It may take some time for your project to be features as I feature them as first come, first served. All submissions may not be featured but I will reply to all submissions. I do ask that when your post is featured that you please post on your blog that day you are be being featured.

Got something? Get it over to me!
extrememeasures@bellsouth.net

Saturday, January 15, 2011

Inspiration: Reading Nook

We've seen a lot of reading nooks across the blogosphere as well as design mags, but most require space the average family doesn't have. However, we came across this reading nook that utilizes a space we all have and makes us want to go read!


Brittany of Pretty Handy Girl took a closet in her son's room, her exceptional DIY & carpentry skills to create an inspiring, cozy, and well lit space that her son can use to go escape into a book. She has even been kind enough to include a full step by step over at her blog, one that we are sure to be using. That's one lucky kid to have a mom with these skills!


Thursday, January 13, 2011

Our Home: Our Biggest Project


If we were really on top of our game, we would’ve started this blog out showing our home from start to finish. But, I hadn’t even thought of starting a blog way back then. Typically, we are too caught up with work on the home and getting to the end of a project to even think about recording our progress.

When we bought the place in May of 2002, I believe we were its 3rd owners in its 25 year old history. I have to tell you, we weren’t completely in love with it. I am generally charmed by older architecture and character, which many homes in Florida lack. However, I know feel challenged by its complete lack of style and create a style within.

I came across the old Open House flyers and. just to let you see where it all started, I have included them so you get a sense of it’s lack of style. if there’s anything we’ve learned from this home, it’s that you should never underestimate the power of a few coats of paint. 

In the upcoming posts, we will update you on where it stands now, but it will be a changin'. 


Hidden Gems: Mini Office


While over at Martha Stewart, I came across this mini office in a chest and think it’s a great option for those with limited space. As a blogger, I know a lot of us save and store articles and things we’ve printed to fall back on for post ideas and thought this would be great for my blogging items. This solution is a great option to an unsightly filing cabinet.

Mini Office in a Chest How-To

They converted a chest into a filing cabinet, complete with bulletin board and immediately transformed into a mini office. The best part is that this conversion is oh-so simple to do.


Wednesday, January 12, 2011

Steal Of The Week: Our Lovely Little Armoire

Even though the last thing we needed was one more project  (we have more than enough on our plates, especially with the chairs I posted about yesterday) ) we just couldn’t pass taking a look at this armoire I came across on Craigslist:
image 2132740982-0


Sure I'd seen better photos for more expensive armoire's on Craigslist, but luckily for us, they'd all been sold.  


image 2132740982-1


Now, lemme tell you, I wasn't really concerned with what it looked like as long as it had good bones. These pictures did not do the piece any justice at all (lucky for me because everyone else passed it up!). This armoire is SOLID OAK in FAB condition!!!!


The plan for this piece? I wanted a craft cabinet like the one seen here:


Lucky, lucky day. Thank you Craigslist!